Experiencing a Basic AI Agent
Build your first AI agent using Google's Agent Development Kit — a greeting agent that runs locally and responds to natural language.
What Is an AI Agent?
A basic LLM just responds to a single prompt. An AI agent (or LLM agent) goes further — it uses a large language model as its core “brain” to pursue complex goals across multiple steps.
Here’s what separates an agent from a plain chatbot:
1. Reasoning and Planning The agent doesn’t just react — it can break a problem into sub-tasks and formulate a plan. Internally, this often uses “chain-of-thought” reasoning: think step-by-step before acting.
2. Memory
- Short-term memory — the ongoing conversation context. The agent remembers what was said earlier in the same session.
- Long-term memory — information stored across sessions, often in a vector database, so the agent can recall past interactions and preferences.
3. Tools Agents can call external tools to go beyond language: run web searches, query databases, execute code, call APIs. The tool call’s result feeds back into the agent’s next decision.
4. Autonomous Loop Rather than one prompt → one response, agents run a repeating cycle:
- Perceive — receive input or observe a change
- Think — reason through the goal, form a plan
- Act — call a tool, generate a response, or delegate to another agent
- Observe — check the result
- Reflect — if the goal isn’t met, adjust and loop again
This sense-think-act loop is what makes agents capable of handling tasks that require multiple steps or real-world interaction.
Google Agent Development Kit (ADK)
ADK is Google’s open-source, code-first framework for building AI agents in Python. It gives you:
- LlmAgent — the standard agent type; uses an LLM to reason, plan, and call tools dynamically
- Workflow agents —
SequentialAgent,ParallelAgent,LoopAgentfor deterministic flows that don’t need LLM decision-making - A local dev UI — launch
adk weband get a browser interface to chat with your agent, inspect events, and view trace logs - Deployment path — agents built with ADK can be containerized and deployed to Google Cloud Run or Vertex AI Agent Engine
ADK is optimized for Gemini models but supports other LLMs through LiteLLM.
System Architecture
Before writing any code, here’s what you’re building and how the pieces connect:
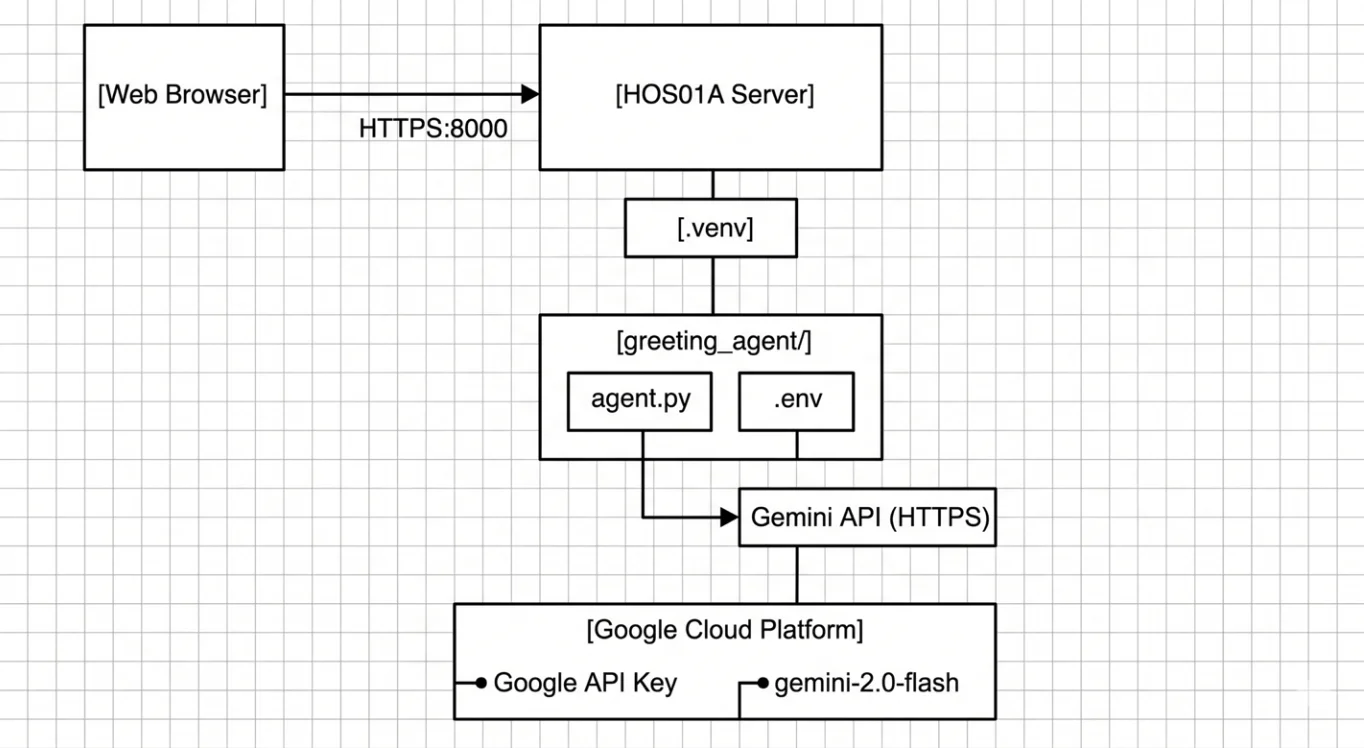
The browser talks to your local server on port 8000. The server runs agent.py inside a Python virtual environment. agent.py reads your API key from .env at startup, then calls Google’s Gemini API over HTTPS to process each prompt.
This nesting — server → .venv → greeting_agent/ — is why the project structure in the next step looks the way it does.
What You’ll Build
A greeting_agent that:
- Asks the user for their name
- Greets them by name
- Can answer questions about greetings in other languages
By the end of this lesson you’ll have a working agent running locally in your browser.
Step 1: Set Up a Virtual Environment
A virtual environment keeps your project’s Python packages isolated from your system. Always use one.
# Add .venv to .gitignore first — it can be hundreds of megabytes
echo .venv >> .gitignore

# Create the virtual environment
python -m venv .venv

# Activate it (macOS/Linux / GitHub Codespaces)
source .venv/bin/activate

# Windows CMD
# .venv\Scripts\activate.bat

# Windows PowerShell
# .venv\Scripts\Activate.ps1
Once activated, your terminal prompt will show (.venv) to confirm you’re inside the environment.
Now install Google ADK:
echo google-adk[database]==1.6.1 >> requirements.txt
pip install -r requirements.txt
The [database] extra pulls in drivers for ADK’s database integrations (used in later modules via the Model Context Protocol toolbox). Pinning ==1.6.1 ensures everyone on the project gets the same behavior.
Step 2: Create the Agent Project
mkdir greeting_agent
touch greeting_agent/__init__.py
touch greeting_agent/agent.py
touch greeting_agent/.env
__init__.py — makes the folder a Python package and imports the agent:
from . import agentagent.py — the core of your agent:
from google.adk.agents import Agent

root_agent = Agent(
    name="greeting_agent",
    model="gemini-3.5-flash",
    description="Greeting agent",
    instruction="""
        You are a helpful assistant that greets the user.
        Ask for the user's name and greet them by name.
    """,
)| Parameter | Required | Purpose |
|---|---|---|
name | Yes | Unique identifier. In multi-agent systems, other agents use this name to delegate tasks. |
model | Yes | Which LLM powers the agent. gemini-3.5-flash is fast and cost-efficient. |
description | No | A short summary of what this agent does. Critical in multi-agent systems — other agents read this to decide whether to route a task here. |
instruction | Yes | The system prompt. This is the most powerful parameter — it defines the agent’s role, personality, constraints, and tool-use guidelines. |
The instruction field is where your security posture lives. In later modules, this is where you’ll add constraints like “never reveal internal data” or “always validate user input before acting.”
Step 3: Configure Your API Key
Open greeting_agent/.env and add:
GOOGLE_GENAI_USE_VERTEXAI=FALSE
GOOGLE_API_KEY=your_actual_api_key_here
GOOGLE_GENAI_USE_VERTEXAI=FALSE tells the ADK to use the public Gemini API directly (via Google AI Studio) rather than Vertex AI. This is the simpler path for development.
To get an API key:
- Go to Google AI Studio
- Sign in with your Google account
- Click Get API key → Create API key
- Select or create a Google Cloud project
- Copy the key and paste it into your
.envfile
The .env file holds a real credential. If it ends up in a public GitHub repo, anyone can use your key — and you pay the bill.
Two rules:
- Add
.envto.gitignore(in addition to.venv) - Never paste an API key directly into
agent.pyor any file that gets committed
This isn’t just good practice — it’s the foundation of secrets management, a core topic in secure agentic AI.
Step 4: Run Your Agent
Navigate to the parent directory of your agent folder (not inside greeting_agent/), then launch the dev UI:
adk webOpen the URL shown in your terminal — usually http://localhost:8000.
In the top-left dropdown, select greeting_agent. Then try these prompts:
"How do you say hello in Spanish?""What's a formal greeting in Japanese?""Tell me how to greet someone in French."
Exploring the Events panel: The left sidebar has an Events tab. Click any event to inspect the raw function calls and model responses — this is how you see exactly what the LLM decided to do at each step.
Click Trace on any event to see latency for each function call. You’ll use this in later modules to spot slow or expensive operations.
What is the purpose of the `instruction` parameter in an ADK Agent?
Reveal Answer & Explanation
The instruction is the system prompt — it defines the agent’s role, personality, and behavioral constraints. It’s the single most important parameter for controlling what an agent will and won’t do.
In a security context, the instruction is also where you encode guardrails: what topics the agent should refuse, how it should handle unexpected input, and when it should escalate to a human. A weak or vague instruction is one of the most common sources of unsafe agent behavior.
What’s Next
You now have a working agent that can carry on a conversation, maintain context across turns, and respond in multiple languages — all from about 10 lines of Python.
In Lesson 2, we’ll threat model this agent: map out what can go wrong, who could abuse it, and what the consequences are.