OWASP Threat Modeling the Basic AI Agent
Use pytm to encode your threat model as code, auto-generate a DFD and threat report, then build a security analyst agent that can answer questions about its own vulnerabilities.
Threat Modeling as Code
In Lesson 2 you drew a DFD by hand and filled in a STRIDE table manually. That works — but it doesn’t scale, and it can’t be version-controlled, diffed, or automated.
pytm (Python Threat Modeling) is an OWASP project that lets you define your system’s architecture as a Python script. From that script, it automatically generates:
- A Data Flow Diagram (rendered by Graphviz)
- A threat report listing every threat it detects, mapped to STRIDE categories
The threat model lives in your repo alongside your code. When the architecture changes, you update the model and re-run it. The diagram and report update automatically.
Step 1: Install pytm and Graphviz
Graphviz is the rendering engine that turns pytm’s output into a PNG diagram.
# GitHub Codespaces / Ubuntu Linux
sudo apt-get update && sudo apt-get install -y graphviz

# macOS
brew install graphviz

# Windows — download from https://graphviz.org/download/
# and add Graphviz's bin/ directory to your system PATH
Add pytm to your project’s requirements.txt (in the same project as greeting_agent/):
google-adk[database]==1.6.1
pytm==1.3.1
Then install:
pip install -r requirements.txtVerify both tools are ready:
python -c "from pytm import TM; print('pytm installed successfully')"
dot -V
You should see pytm’s confirmation and Graphviz’s version number.
Step 2: Write the Threat Model
Create a new file in your project root (not inside greeting_agent/):
touch threat_model.pyPaste in the following code:
from pytm import TM, Actor, Boundary, Dataflow, Datastore, Process, Classification

tm = TM("HOS01A Greeting Agent Threat Model")
tm.description = "Threat model for the HOS01A greeting agent."
tm.isOrdered = True
tm.mergeResponses = True

# --- Trust Boundaries ---
internet        = Boundary("Internet")
gcp_boundary    = Boundary("Google Cloud Platform")
server_boundary = Boundary("HOS01A Server")
venv_boundary   = Boundary("Python Virtual Environment (.venv)")

# --- External Actors ---
user       = Actor("Web Browser User")
user.inBoundary = internet

google_llm = Actor("Google Gemini API")
google_llm.inBoundary = gcp_boundary

# --- Internal Processes ---
adk_web_ui = Process("adk web (Dev UI)")
adk_web_ui.inBoundary = server_boundary
adk_web_ui.sanitizesInput = False

agent_process = Process("agent.py (greeting_agent)")
agent_process.inBoundary = venv_boundary
agent_process.sanitizesInput = False
agent_process.validatesInput  = False

# --- Data Store ---
env_file = Datastore(".env File")
env_file.inBoundary = server_boundary
env_file.isEncrypted = False
env_file.storesSensitiveData = True
env_file.classification = Classification.SECRET

# --- Data Flows ---
user_to_ui = Dataflow(user, adk_web_ui, "User Prompt (HTTP)")
user_to_ui.protocol    = "HTTP"
user_to_ui.isEncrypted = False
user_to_ui.sanitizes   = False

ui_to_agent = Dataflow(adk_web_ui, agent_process, "Routed Prompt")
ui_to_agent.sanitizes = False

env_to_agent = Dataflow(env_file, agent_process, "API Key + Config")
env_to_agent.isEncrypted   = False
env_to_agent.classification = Classification.SECRET

agent_to_llm = Dataflow(agent_process, google_llm, "API Request (HTTPS)")
agent_to_llm.protocol       = "HTTPS"
agent_to_llm.isEncrypted    = True
agent_to_llm.classification = Classification.SENSITIVE

llm_to_agent = Dataflow(google_llm, agent_process, "LLM Response (HTTPS)")
llm_to_agent.protocol    = "HTTPS"
llm_to_agent.isEncrypted = True

ui_to_user = Dataflow(adk_web_ui, user, "Response (HTTP)")
ui_to_user.isEncrypted = False

if __name__ == "__main__":
tm.process()The Boolean flags on each object are not just labels — pytm reads them to decide which threats to flag automatically.
| Property | Effect when False or set to SECRET |
|---|---|
sanitizesInput = False | pytm flags Tampering and Elevation of Privilege threats on that process |
validatesInput = False | Additional input-handling threats are generated |
isEncrypted = False | pytm flags Information Disclosure threats on that flow or store |
storesSensitiveData = True | Marks the data store as a high-value target |
classification = Classification.SECRET | The highest sensitivity level — pytm generates more aggressive disclosure threats |
Every False is a deliberate statement: “this control does not exist yet.” When you add input sanitization to your agent, you flip the flag to True and re-run — the threat report shrinks.
This is threat modeling as living documentation.
Step 3: Generate the DFD and Threat Report
Threat report:
python threat_model.py --report basic_template.md > threats.mdOpen threats.md. You should see threats covering:
- Input validation failures → Tampering / Elevation of Privilege
- Sensitive data stored in a plaintext file → Information Disclosure
- Unencrypted HTTP data flows → Information Disclosure
- Missing authentication on the dev UI endpoint → Spoofing
DFD diagram:
python threat_model.py --dfd | dot -Tpng -o dfd.pngdot is the Graphviz command-line tool. This pipes pytm’s DOT-format output into Graphviz to produce a PNG. Your dfd.png should match this:
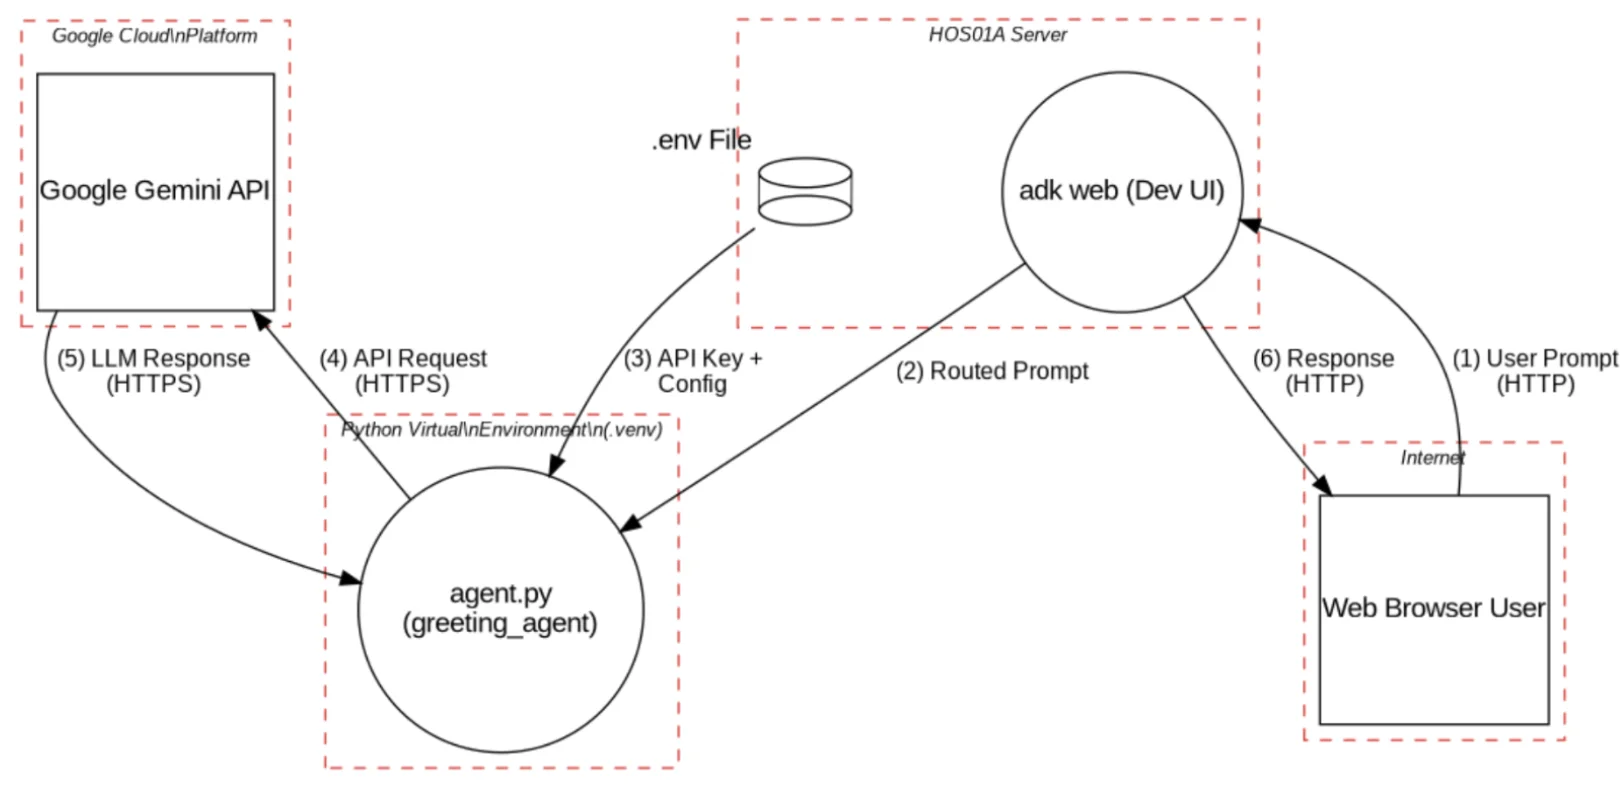
Every element in the diagram maps directly to a Python object in threat_model.py. If a component is missing from the diagram, it means you forgot to define it in the model — and pytm won’t analyze it.
Compare this generated diagram with the hand-drawn DFD from Lesson 2. Did pytm capture every element? Are there components in your manual diagram that you forgot to include in the model? Those gaps are worth noting — anything not in the model isn’t being analyzed.
Step 4: Build a Security Analyst Agent
Now you’ll build a second agent that reads the pytm-generated threat report and acts as a security analyst — answering questions about the system’s threats and mitigations.
mkdir threat_agent
touch threat_agent/__init__.py
touch threat_agent/agent.py
cp greeting_agent/.env threat_agent/.env
Your project structure should now look like this:
your-project/
├── greeting_agent/          ← from Lesson 1, leave untouched
│   ├── __init__.py
│   ├── agent.py
│   └── .env
├── threat_agent/            ← new
│   ├── __init__.py
│   ├── agent.py
│   └── .env
├── threat_model.py
├── threats.md               ← generated by pytm
├── dfd.png                  ← generated by pytm
└── requirements.txtthreat_agent/__init__.py:
from . import agentthreat_agent/agent.py:
import os
from google.adk.agents import Agent

_REPORT_PATH = os.path.join(os.path.dirname(__file__), "..", "threats.md")

def _load_report(path):
    resolved = os.path.abspath(path)
    if not os.path.exists(resolved):
        return "Threat report not found. Run: python threat_model.py --report threats.md"
    with open(resolved, "r", encoding="utf-8") as f:
        return f.read()

_report = _load_report(_REPORT_PATH)

root_agent = Agent(
    name="threat_modeling_agent",
    model="gemini-3.5-flash",
    description="A security analyst agent that reviews threat models for AI agent systems.",
    instruction=f"""
You are an expert application security engineer and AI safety specialist.

You have been given the following pytm-generated threat report:

---
{_report}
---

Your responsibilities:
1. Answer questions about the threats clearly and accurately.
2. Identify threats pytm may have missed, especially LLM-specific threats such as:
   - Prompt Injection (LLM01): user input overriding system instructions
   - Sensitive Information Disclosure (LLM02): model revealing context data
   - Model Denial of Service (LLM04): adversarial prompts causing token overuse
   - Insecure Output Handling (LLM05): agent output rendered without sanitization
3. Recommend specific, actionable mitigations using STRIDE categories.
4. When asked to prioritize, use Risk = Likelihood × Impact.
5. Keep responses concise but precise. Use bullet points for lists.
6. If uncertain, say so rather than guessing.
7. Ground all answers in the system described in the threat report.
""",
)Notice that the entire threats.md file is embedded directly into the instruction field:
instruction=f"""
...
{_report}
...
"""
This is called context injection — loading external knowledge into an agent’s system prompt at startup. The agent has full awareness of the threat report without needing a tool call or a database.
This pattern is simple and powerful for read-only reference data. It has a limit though: if threats.md grows large enough, it can hit the model’s context window. In later modules you’ll see retrieval-based approaches (vector search, tool calls) that handle larger knowledge bases without filling the context.
The security implication: whatever you inject into the instruction becomes part of the agent’s “ground truth.” If that file is tampered with — say, an attacker modifies threats.md before the agent loads it — the agent reasons from corrupted data. File integrity is a threat surface.
Step 5: Run the Agent and Explore Security Questions
Navigate to the project root and launch:
adk webSelect threat_modeling_agent from the dropdown. Work through these prompts in order — each one probes a different aspect of the threat model:
Understanding the report:
"What are the top three threats in this system by severity?""Does the threat report cover prompt injection? If not, what would that threat look like for this agent?""What threats exist at the trust boundary between the HOS01A server and Google Cloud?"
Exploring specific components:
"The .env file stores the API key in plaintext. What are three ways to improve this?""If I deployed adk web to a public URL instead of localhost, how does the threat landscape change?"
Advanced scenarios:
"Walk me through a complete attack scenario where an attacker gains access to the .env file.""OWASP's Top 10 for LLM Applications includes LLM01: Prompt Injection. How does this apply specifically to the greeting agent?""Compare the threats in this system with those in a traditional web application that does not use an LLM."
As you read the responses, notice three things: where the agent accurately summarizes the pytm report, where it adds insight beyond what pytm generated, and where it’s uncertain or wrong.
The threat_modeling_agent can make mistakes. It may miss threats, misclassify severity, or suggest mitigations that don’t fit your specific environment.
This is true of any AI security tool. The value is speed and coverage — it surfaces candidates faster than a manual review. The job of the human engineer is to verify, challenge, and prioritize what the agent produces.
Never ship a mitigation solely because an AI agent recommended it. Verify every recommendation against authoritative sources: OWASP documentation, CVE databases, your organization’s security policies.
The threat_modeling_agent loads threats.md into its instruction at startup. What happens to the agent's security analysis if an attacker modifies threats.md before the agent starts?
Reveal Answer & Explanation
The agent reasons from the tampered file as if it were authoritative. If the attacker removes certain threats from threats.md, the agent won’t know to mention them — and may even actively reassure users that those attack vectors don’t exist.
This is a Tampering threat (from STRIDE) applied to the agent itself. The integrity of the agent’s knowledge base is a security property, not just a data management concern.
Mitigations include:
- Store
threats.mdwith restrictive file permissions - Checksum the file at startup and refuse to launch if the hash doesn’t match a known-good value
- In production, pull the report from a trusted, access-controlled source rather than a local file
This is one reason security-sensitive agents shouldn’t blindly trust files on disk — the file system is a trust boundary too.
What You’ve Built Across Module 1
Over three lessons you’ve gone from a 10-line greeting agent to a complete security feedback loop:
- Lesson 1 — Built a basic ADK agent and understood its components
- Lesson 2 — Mapped the system manually with DFDs and STRIDE
- Lesson 3 — Automated that analysis with pytm and built an agent that interrogates its own threat model
This pattern — build, model, analyze — repeats in every module. As the agents gain tools, memory, and the ability to talk to each other, the threat surface grows. The pytm model grows with it.
Module 2 introduces agents with tools. The first thing we’ll do is add tool calls to the pytm model and watch the new threats appear.