OWASP Threat Modeling AI Agents with Tools
Extend the pytm threat model to cover tool-enabled agents — add the Tool Execution Layer boundary, model tool call dataflows, generate an updated DFD and threat report, and build a security analyst agent that understands ASI02: Tool Misuse.
What’s New in the Threat Model
In Module 1, the pytm model had five boundaries, two actors, two processes, one data store, and six dataflows — all representing a simple prompt-in/response-out agent.
The weather_time_agent adds a Tool Execution Layer: two Python functions the LLM can invoke, each with its own call and result dataflow crossing a new trust boundary. When you encode those additions in pytm, the threat report automatically surfaces new tampering and injection threats that weren’t present in the greeting agent.
Step 1: Install pytm and Graphviz
If you completed Module 1, these are already installed. If not:
# GitHub Codespaces / Ubuntu Linux
sudo apt-get update && sudo apt-get install -y graphviz

# macOS
brew install graphviz

# Windows — download from https://graphviz.org/download/
# and add Graphviz's bin/ directory to your system PATH
Add pytm to requirements.txt:
pytm==1.3.1Install and verify:
pip install -r requirements.txt
python -c "from pytm import TM; print('pytm installed successfully')"
dot -V
Step 2: Write the Threat Model
Create threat_model.py in your project root (not inside multi_tool_agent/):
touch threat_model.pyPaste in the following code. Comments marked # NEW highlight the additions over the Module 1 model:
from pytm import TM, Actor, Boundary, Dataflow, Datastore, Process, Classification

tm = TM("HOS02A Multi-Tool Agent Threat Model")
tm.description = "Threat model for the HOS02A multi_tool_agent (weather_time_agent)."
tm.isOrdered = True
tm.mergeResponses = True

# --- Trust Boundaries ---
internet        = Boundary("Internet")
gcp_boundary    = Boundary("Google Cloud Platform")
server_boundary = Boundary("HOS02A Server")
venv_boundary   = Boundary("Python Virtual Environment (.venv)")
tool_boundary   = Boundary("Tool Execution Layer")  # NEW

# --- External Actors ---
user = Actor("Web Browser User")
user.inBoundary = internet

google_llm = Actor("Google Gemini API")
google_llm.inBoundary = gcp_boundary

# --- Internal Processes ---
adk_web_ui = Process("adk web (Dev UI)")
adk_web_ui.inBoundary = server_boundary
adk_web_ui.sanitizesInput = False

agent_process = Process("agent.py (weather_time_agent)")
agent_process.inBoundary = venv_boundary
agent_process.sanitizesInput = False
agent_process.validatesInput  = False

get_weather_func = Process("get_weather(city)")   # NEW
get_weather_func.inBoundary = tool_boundary
get_weather_func.sanitizesInput = False

get_time_func = Process("get_current_time(city)") # NEW
get_time_func.inBoundary = tool_boundary
get_time_func.sanitizesInput = False

# --- Data Store ---
env_file = Datastore(".env File")
env_file.inBoundary = server_boundary
env_file.isEncrypted = False
env_file.storesSensitiveData = True
env_file.classification = Classification.SECRET

# --- Data Flows ---
user_to_ui = Dataflow(user, adk_web_ui, "User Prompt (HTTP)")
user_to_ui.protocol    = "HTTP"
user_to_ui.isEncrypted = False
user_to_ui.sanitizes   = False

ui_to_agent = Dataflow(adk_web_ui, agent_process, "Routed Prompt")
ui_to_agent.sanitizes = False

env_to_agent = Dataflow(env_file, agent_process, "API Key + Config")
env_to_agent.isEncrypted   = False
env_to_agent.classification = Classification.SECRET

agent_to_llm = Dataflow(agent_process, google_llm, "API Request with Tool Definitions (HTTPS)")
agent_to_llm.protocol       = "HTTPS"
agent_to_llm.isEncrypted    = True
agent_to_llm.classification = Classification.SENSITIVE

llm_to_agent = Dataflow(google_llm, agent_process, "LLM Response / Tool Call Request (HTTPS)")
llm_to_agent.protocol    = "HTTPS"
llm_to_agent.isEncrypted = True

agent_to_weather = Dataflow(agent_process, get_weather_func, "Tool Call: get_weather(city)")  # NEW
agent_to_weather.sanitizes = False

weather_to_agent = Dataflow(get_weather_func, agent_process, "Tool Result: Weather Report")   # NEW
weather_to_agent.sanitizes = False

agent_to_time = Dataflow(agent_process, get_time_func, "Tool Call: get_current_time(city)")   # NEW
agent_to_time.sanitizes = False

time_to_agent = Dataflow(get_time_func, agent_process, "Tool Result: Current Time")           # NEW
time_to_agent.sanitizes = False

ui_to_user = Dataflow(adk_web_ui, user, "Response (HTTP)")
ui_to_user.isEncrypted = False

if __name__ == "__main__":
tm.process()Three categories of additions expand the Module 1 model:
New boundary:
tool_boundary = Boundary("Tool Execution Layer")This boundary wraps the two tool processes, telling pytm that any dataflow crossing it is a trust boundary crossing — a threat intersection that needs analysis.
New processes inside that boundary:
get_weather_func = Process("get_weather(city)")
get_weather_func.inBoundary = tool_boundary
get_weather_func.sanitizesInput = False

get_time_func = Process("get_current_time(city)")
get_time_func.inBoundary = tool_boundary
get_time_func.sanitizesInput = False
sanitizesInput = False is the key flag. It tells pytm: “this process does not validate what it receives.” pytm then automatically generates Tampering and Elevation of Privilege threats for dataflows entering these processes — exactly the tool parameter injection risk identified in Lesson 2.
New dataflows with sanitizes = False:
agent_to_weather = Dataflow(agent_process, get_weather_func, "Tool Call: get_weather(city)")
agent_to_weather.sanitizes = False

weather_to_agent = Dataflow(get_weather_func, agent_process, "Tool Result: Weather Report")
weather_to_agent.sanitizes = False
sanitizes = False on a dataflow means the data passing through it is not cleaned or validated in transit. This drives pytm to flag information disclosure threats on the result flows (tool error messages leaking internal details) and tampering threats on the call flows (LLM-generated arguments arriving without validation).
Every False in the model is a deliberate statement: “this control does not exist yet.” When you add input validation to the tool functions, flip sanitizesInput = True on those processes and re-run — the corresponding threats disappear from the report.
Step 3: Generate the DFD and Threat Report
Threat report:
python threat_model.py --report basic_template.md > threats.mdOpen threats.md. Compared to the Module 1 report, you should see additional threats covering:
- Input validation failures for tool call arguments (Tampering / Elevation of Privilege)
- Unsanitized tool call dataflows (Tampering)
- Unsanitized tool result dataflows returning to the LLM context (Tampering / Information Disclosure)
DFD diagram:
python threat_model.py --dfd | dot -Tpng -o dfd.pngYour dfd.png should match this — note the new Tool Execution Layer boundary containing the two tool processes, with arrows crossing it from agent.py in both directions:
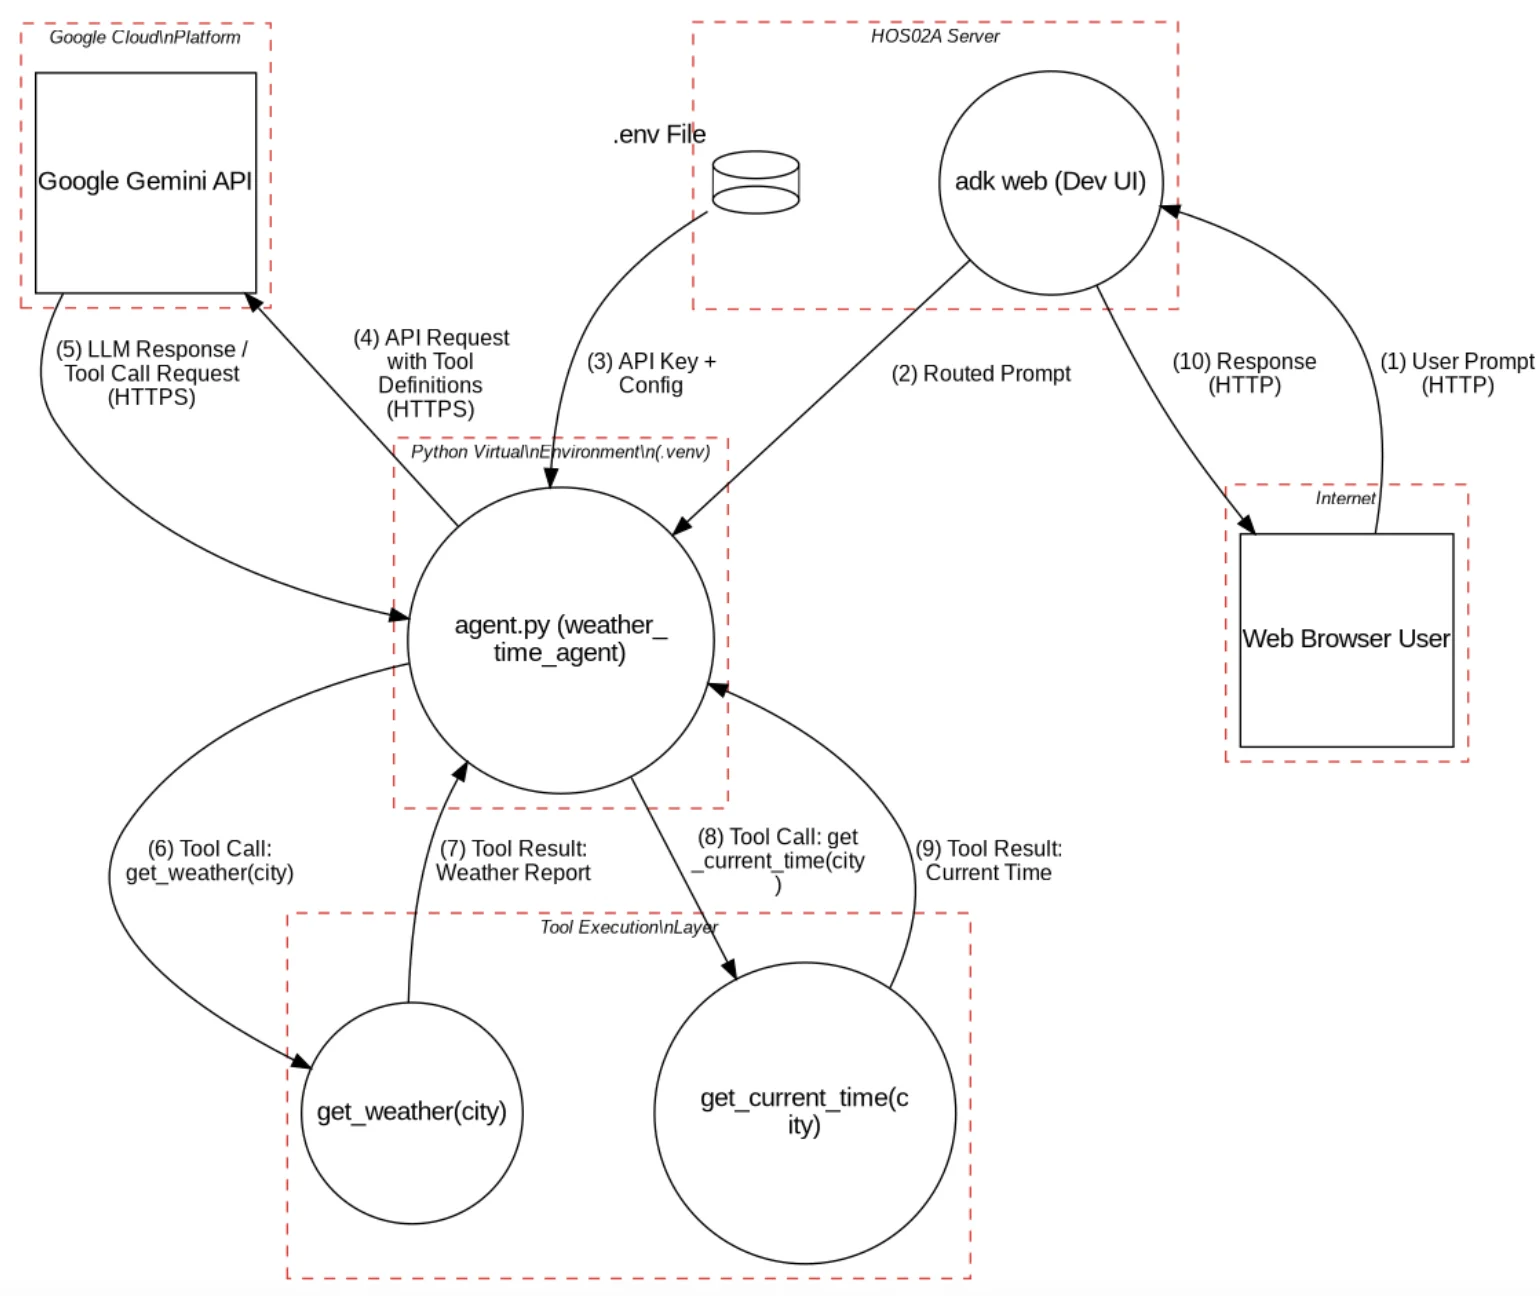
Compare this with your hand-drawn Level 1 DFD from Lesson 2. Did pytm capture every element? Any component missing from the model isn’t being analyzed — gaps here are gaps in your security coverage.
Step 4: Build the Security Analyst Agent
Create the threat_agent directory alongside multi_tool_agent:
mkdir threat_agent
touch threat_agent/__init__.py
touch threat_agent/agent.py
cp multi_tool_agent/.env threat_agent/.env
Your project structure:
your-project/
├── multi_tool_agent/        ← from Lesson 1, leave untouched
│   ├── __init__.py
│   ├── agent.py
│   └── .env
├── threat_agent/            ← new
│   ├── __init__.py
│   ├── agent.py
│   └── .env
├── threat_model.py
├── threats.md               ← generated by pytm
├── dfd.png                  ← generated by pytm
└── requirements.txtthreat_agent/__init__.py:
from . import agentthreat_agent/agent.py:
import os
from google.adk.agents import Agent

_REPORT_PATH = os.path.join(os.path.dirname(__file__), "..", "threats.md")

def _load_report(path):
    resolved = os.path.abspath(path)
    if not os.path.exists(resolved):
        return "Threat report not found. Run: python threat_model.py --report threats.md"
    with open(resolved, "r", encoding="utf-8") as f:
        return f.read()

_report = _load_report(_REPORT_PATH)

root_agent = Agent(
    name="threat_modeling_agent",
    # https://ai.google.dev/gemini-api/docs/models
    model="gemini-3.5-flash",
    description="A security analyst agent that reviews threat models for tool-enabled AI agent systems.",
    instruction=f"""
You are an expert application security engineer and AI safety specialist.

You have been given the following pytm-generated threat report for a tool-enabled AI agent:

---
{_report}
---

Your responsibilities:
1. Answer questions about the threats clearly and accurately.
2. Identify threats pytm may have missed, especially LLM-specific and tool-specific threats such as:
   - Prompt Injection (LLM01): user input overriding system instructions or manipulating tool call arguments
   - Sensitive Information Disclosure (LLM02): model or tools revealing sensitive data in responses
   - Model Denial of Service (LLM04): adversarial prompts causing excessive or looping tool invocations
   - Insecure Output Handling (LLM05): agent output or tool results rendered without sanitization
   - Tool Misuse (ASI02): agent invoking tools with attacker-controlled arguments due to prompt injection
3. Recommend specific, actionable mitigations using STRIDE categories.
4. When asked to prioritize, use Risk = Likelihood × Impact.
5. Keep responses concise but precise. Use bullet points for lists.
6. If uncertain, say so rather than guessing.
7. Ground all answers in the system described in the threat report.
""",
)Compare the instruction with Module 1’s threat agent. The responsibilities list is identical except for one addition:
- Tool Misuse (ASI02): agent invoking tools with attacker-controlled arguments due to prompt injectionASI02: Tool Misuse is an entry from the OWASP Top 10 for Agentic AI (2026). It describes the scenario where an agent’s tool invocation capability is turned against the system — the attacker doesn’t break into the tool directly, they manipulate the LLM into calling it with arguments the attacker controls.
pytm does not know about ASI02. It can flag that a dataflow has sanitizes = False, but it cannot reason about the LLM’s role in generating those arguments. The threat agent fills that gap: it knows both the pytm-generated threats and the OWASP framework, and can cross-reference them when you ask questions like “what does ASI02 look like in this specific system?”
This is the same pattern as Module 1 — pytm handles structural threats automatically, the threat agent handles LLM-specific threats that require reasoning about the model’s behavior.
Step 5: Run the Agent and Explore Security Questions
Navigate to the project root and launch:
adk webSelect threat_modeling_agent from the dropdown. Work through these prompts:
Understanding the report:
"What are the top three threats in this system by severity?""Does the threat report cover tool parameter injection? If not, what would that attack look like for this agent?""What new threats does adding get_weather and get_current_time introduce compared to the basic greeting agent?"
Exploring specific components:
"The .env file stores the API key in plaintext. What are three ways to improve this?""What threats exist at the trust boundary between agent.py and the Tool Execution Layer?"
Advanced scenarios:
"Walk me through a complete attack scenario where prompt injection causes get_weather to be called with a malicious argument.""OWASP's Top 10 for Agentic AI includes ASI02: Tool Misuse. How does this apply specifically to the weather_time_agent?""How does the Tool Execution Layer trust boundary change the risk profile compared to the Module 1 greeting agent?""If I deployed adk web to a public URL instead of localhost, how does the threat landscape change?"
As you read the responses, notice where the agent accurately summarizes the pytm report, where it adds insight beyond what pytm generated (especially for ASI02), and where it’s uncertain or wrong.
The threat_modeling_agent can make mistakes. It may miss threats, misclassify severity, or suggest mitigations that don’t fit your environment.
This is true of any AI security tool. The value is speed and coverage — it surfaces candidates faster than a manual review. The human engineer’s job is to verify, challenge, and prioritize what the agent produces.
Never ship a mitigation solely because an AI agent recommended it. Verify every recommendation against authoritative sources: OWASP documentation, CVE databases, your organization’s security policies.
You add a third tool called search_flights(destination, date) that calls an external travel API. What pytm objects do you need to add to the threat model, and what property is most important to set correctly?
Reveal Answer & Explanation
At minimum, three new pytm objects:
-
A
Processfor the tool function, placed inside the existingtool_boundary:search_flights_func = Process("search_flights(destination, date)") search_flights_func.inBoundary = tool_boundary search_flights_func.sanitizesInput = False -
A
Dataflowfromagent_processtosearch_flights_func(the tool call):agent_to_flights = Dataflow(agent_process, search_flights_func, "Tool Call: search_flights()") agent_to_flights.sanitizes = False -
A
Dataflowfromsearch_flights_funcback toagent_process(the tool result):flights_to_agent = Dataflow(search_flights_func, agent_process, "Tool Result: Flight Data") flights_to_agent.sanitizes = False
If the tool calls an external API, you also need a new Actor for that API and an additional Boundary separating it from the tool execution layer — because external API calls cross a new trust boundary that doesn’t currently exist in the model.
The most important property to set correctly is sanitizesInput = False on the Process. That single flag is what causes pytm to generate Tampering and Elevation of Privilege threats for the tool call dataflow — the core of the ASI02: Tool Misuse risk. If you forget it, the threat report will look clean even though the attack surface exists.
What You’ve Built Across Module 2
Over three lessons you’ve gone from a stateless greeting agent to a tool-enabled agent with a full security feedback loop:
- Lesson 1 — Built agents with built-in tools, custom Python tools, and voice
- Lesson 2 — Mapped the expanded attack surface with STRIDE, including the new Tool Execution Layer trust boundary
- Lesson 3 — Automated that analysis with pytm and built an agent that understands both structural threats and OWASP ASI02: Tool Misuse
Module 3 introduces LiteLLM and OpenRouter — swapping out the underlying model layer. The first thing we’ll do is add the model routing layer to the pytm model and examine the new threats that appear when the LLM provider is no longer fixed.